Overview of the Admin Dashboard
Knowing how to use the dashboard overview is helpful because it lets admins make quick decisions based on real-time information. They can see problems early and fix them before they get worse. It also helps manage resources better and keep track of goals, making sure everything runs smoothly and efficiently.
In this documentation, you’ll learn what you need to know before getting started with Edmingle.
Let’s get started 🚀
Admin Dashboard List View
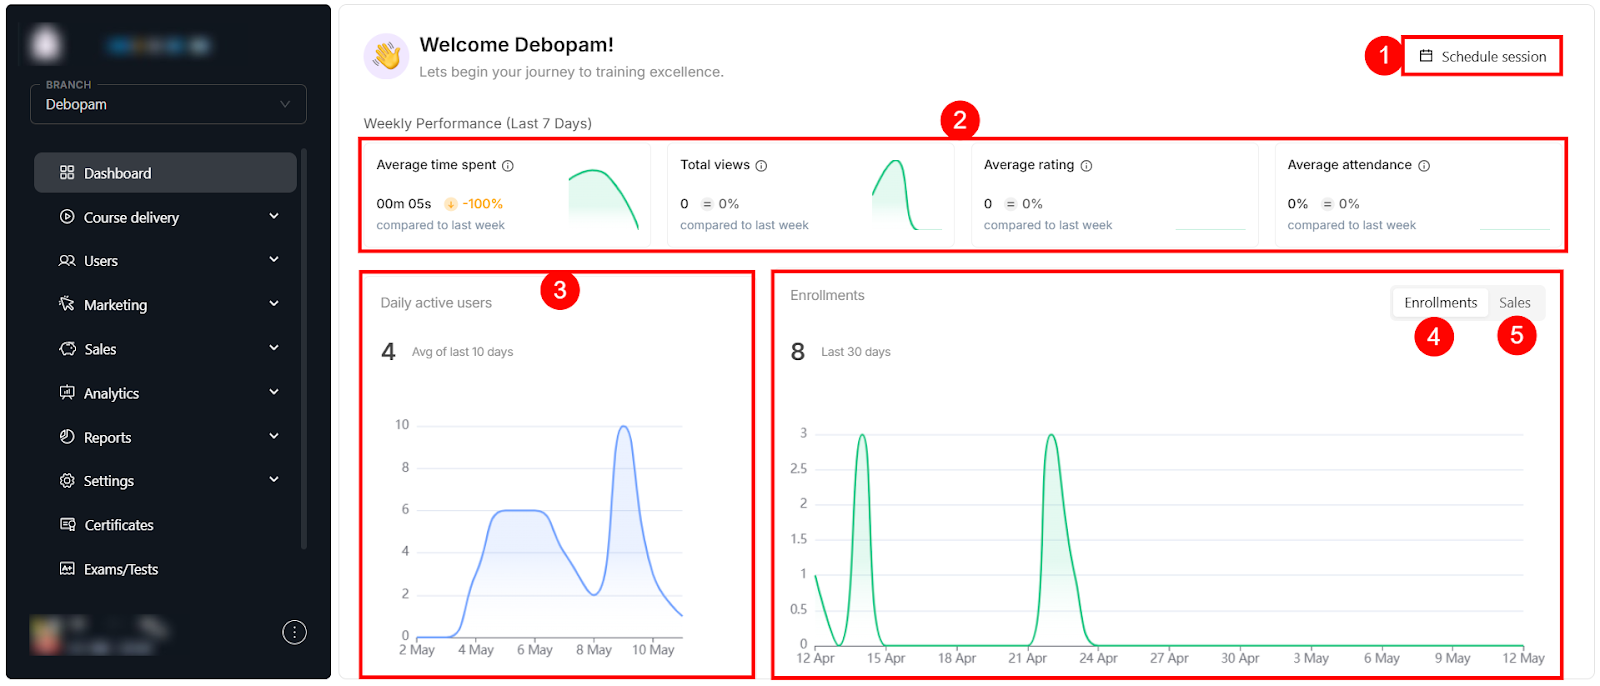
The Dashboard Screen shows you everything you need to know about your platform in one place. You can see how much time learners are spending, how many sessions are scheduled, and how many people have joined. It also lets you check daily activity, track enrollments over time, and view important numbers like attendance and ratings.
Refer to the following table to understand more about the dashboard list view.
Schedule a New Session
Scheduling a new session in an online learning platform is a simple way to keep your course organized and make sure learners stay on track. It allows you to plan when each class will happen, share the right content at the right time, and keep learners engaged with regular updates.
Carefully follow the instructions below to know how you can efficiently schedule a new session in your organization’s learning platform.
Step 1: Click on the “Schedule Session” button at the top-right corner of the screen.
Step 2: A new window will open on the screen where you can create a new session.
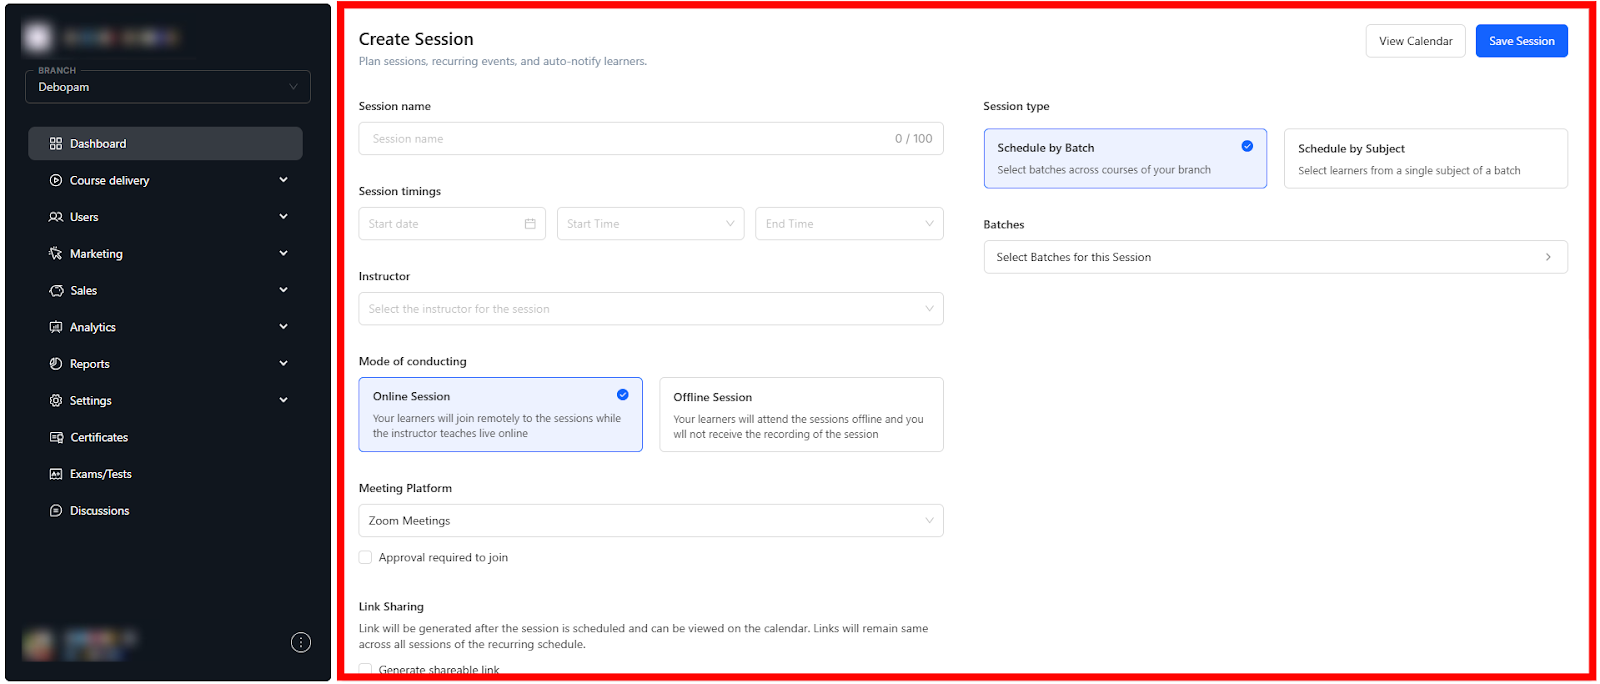
For more information regarding how you can create a new session, refer to the “How to Schedule a New Session in the Course?” document.
View Sales Analytics
Sales analytics in an online learning platform help you see how well your courses are selling and how much money you’re making. By checking this data, you can find out which courses are the most popular and when learners are most likely to buy. This information makes it easier to improve your courses, plan better promotions, and grow your earnings over time.
Carefully follow the instructions below to know how you can efficiently view sales analytics in your organization’s learning platform.
Click on the “Sales” tab to view sales analytics.
Change Currency
Carefully follow the instructions below to know how you can efficiently change the currency in your organization’s learning platform.
Click on the currency dropdown and select an appropriate currency.
View Enrollment Analytics
Carefully follow the instructions below to know how you can efficiently view enrollment analytics in your organization’s learning platform.
Click on the “Sales” tab to view the enrollment analytics.
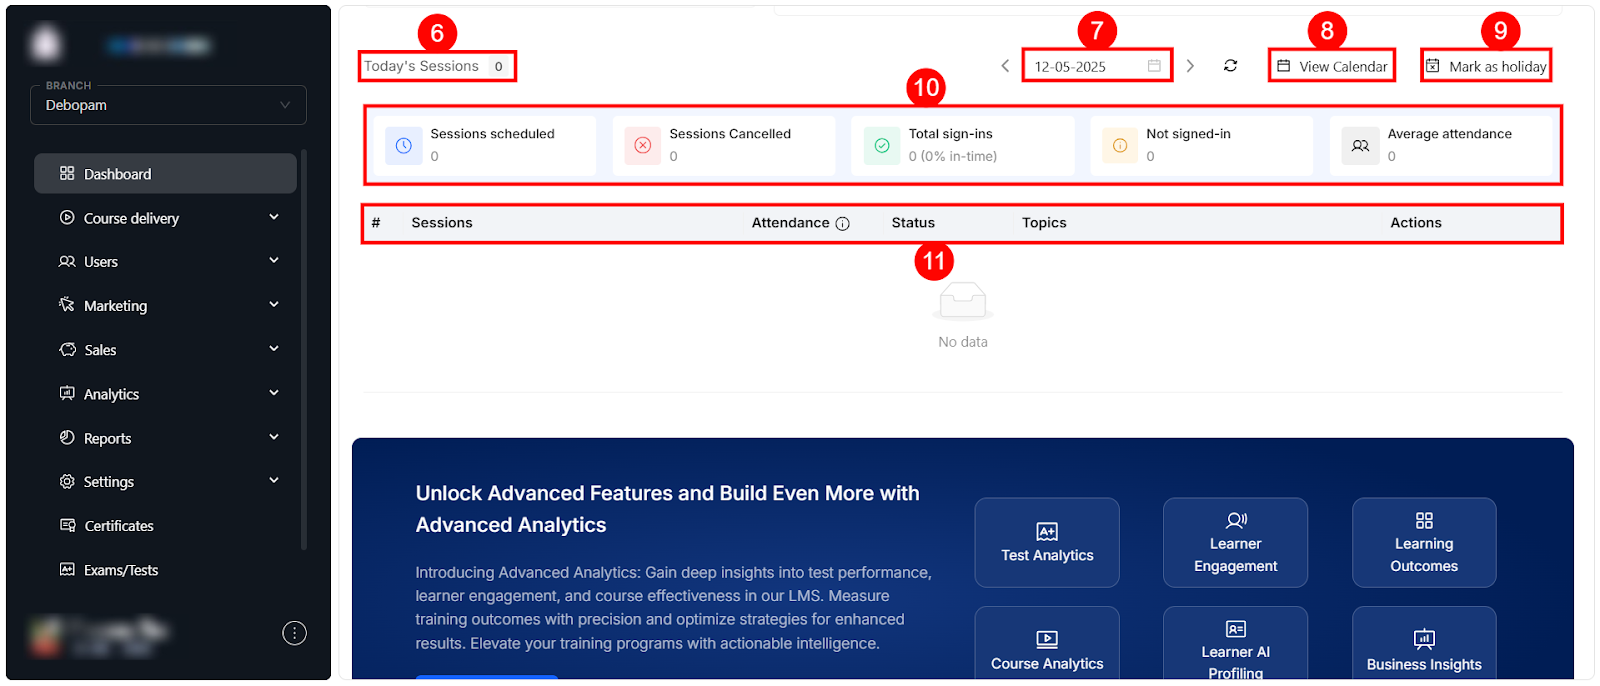
View Previous Sessions
Sometimes, you may need to change the session date on your online learning platform due to schedule changes, holidays, or other unexpected reasons. Updating the session date helps keep the course on track and ensures that all learners stay informed and prepared.
Carefully follow the instructions below to know how you can efficiently change the session date in your organization’s learning platform.
Click on the session date dropdown and select an appropriate date whose session details you want to view.

View Session Calendar
Click on the “View Session” button to view the session calendar.

Mark a Date as a Holiday
By marking holidays in advance, you make sure that everyone gets a break and no one misses important lessons or deadlines.
Carefully follow the instructions below to know how you can efficiently mark a date as a holiday in your organization’s learning platform.
Step 1: Click on the “Mark as Holiday” button to start marking a date as a holiday.
Step 2: A new window will open in the center of the screen. Select an appropriate branch, select a start & date, then click on the “Mark as Holiday” button.
Sign In to a Session
Carefully follow the instructions below to know how you can efficiently sign in to a session in your organization’s learning platform.
Step 1: Click on the “Sign In” button at the end of a session.
Step 2: A confirmation box will appear in the middle of the screen. Click on the “Sign In” button to confirm your decision.
Related Articles
How to Integrate Edmingle Payment Gateway?
Edmingle offers an in-built payment gateway powered by Razorpay to help you securely collect payments via UPI, cards, net banking, and wallets. This guide provides step-by-step instructions to integrate and activate the gateway on your academy’s ...How to Apply for an Android Application?
Edmingle allows you to deploy your own Android application to provide a seamless on-the-go mobile learning experience for your learners. Depending on your subscription plan, you may be eligible for either a common app or a fully branded app. ...How to Apply for an iOS Application?
Edmingle offers iOS application deployment to enable learners to access your academy via the Apple App Store. Depending on your plan, you may access either a common app or a custom-branded app. Eligibility Based on Plan Core & Prime Plans: Eligible ...How to Whitelabel Your LMS Domain?
Whitelisting your LMS domain is the very first step to take control of your Academy Setup and Branding. White-labelling your domain lets you use a custom website URL that reflects your brand, creating a seamless and professional experience for your ...How to Register & Enroll New Learners?
Enrolling new learning in your organization’s learning platform helps the educator manage adding new learners. This section makes enrolling learners in their courses easy and ensures they have access to everything they need. By using this section, ...