How to Integrate Edmingle Payment Gateway?
Edmingle offers an in-built payment gateway powered by Razorpay to help you securely collect payments via UPI, cards, net banking, and wallets. This guide provides step-by-step instructions to integrate and activate the gateway on your academy’s platform.

Step 1: Access the Integration Settings

Log in to your Edmingle admin dashboard.
Navigate to Settings from the left-hand menu.
Select Integrations.
Under the Payment Gateways section, locate Edmingle Pay (Powered by Razorpay) and click Connect.
Step 2: Enter Business and Banking Details
Fill in the required fields in the integration form:
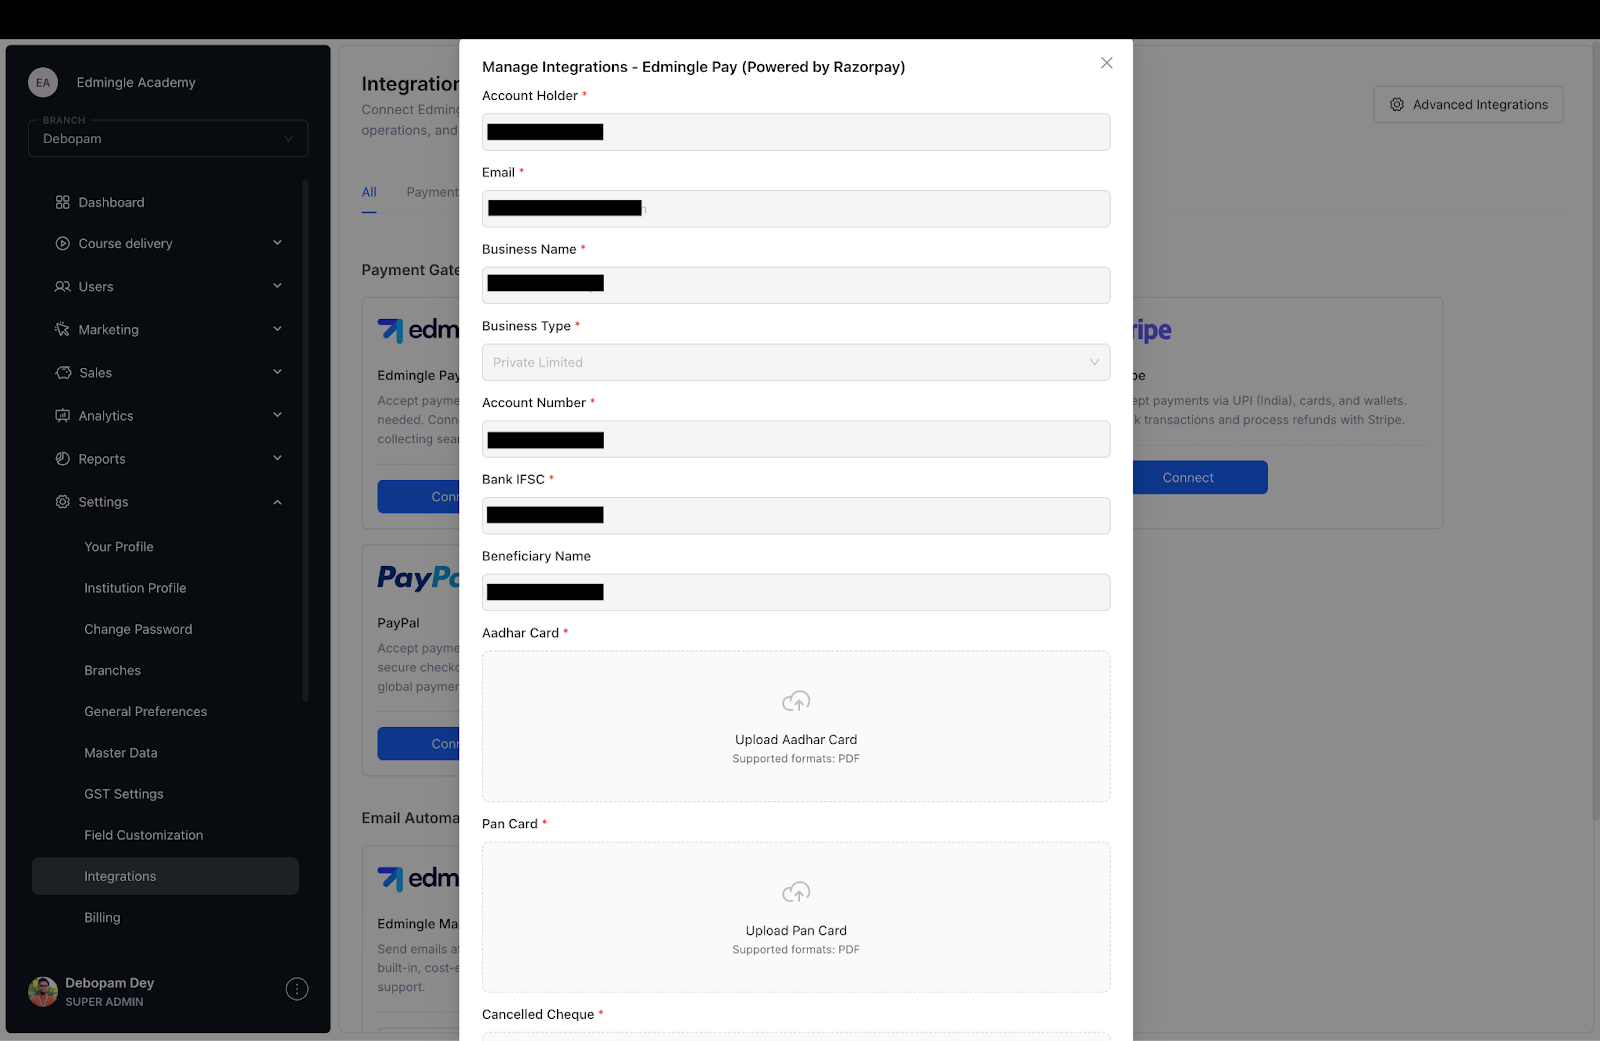
Business Details
Account Holder: Enter the name as per your bank account.
Email: Enter your registered business email address.
Business Name: Provide the legal name of your business or academy.
Business Type: Choose the appropriate business type (e.g., Private Limited, Sole Proprietorship, etc.).
Bank Details
Account Number: Enter your valid bank account number.
Bank IFSC Code: Enter the IFSC code of your bank branch.
Beneficiary Name: This should match the name on your bank account.
Step 3: Upload Mandatory Documents
You are required to upload the following documents in PDF format:
Aadhar Card: Identity verification of the account holder.
PAN Card: Required for tax compliance and verification.
Cancelled Cheque: Must display the account number, IFSC, and account holder’s name.
 Ensure that all documents are clearly scanned and match the information provided in the form.
Step 4: Submit and Connect
Once all fields are completed and documents uploaded:
Click on the Connect button.
Your details will be submitted for verification by the Edmingle team.
 The integration is typically activated within 24 to 48 business hours upon successful verification.
Post-Integration Access
After activation:
Payments made by learners will be processed through your Razorpay-linked account.
You can track payment activity under the Sales → Payments section of your dashboard.
Refunds and settlements will follow Razorpay's standard processes.
For Power and Maxx Plans, you will have an option to integrate your own Payment Gateways. Please go to the integrations section for their documentaions. Available Payment Gateways for integration:
1. Razorpay (Indian & International Payments Supported)
2. Easebuzz (Only Indian Payments Supported)
3. Stripe (Indian & International Payments Supported)
4. Paypal (Only International Payments Supported)

Related Articles
Getting Started with Edmingle: What You Need to Know?
Welcome to Edmingle! Before you start using the platform, there are a few important things you need to have ready. Getting started with Edmingle means understanding its core features and setup requirements to ensure a smooth and productive ...How to Apply for an Android Application?
Edmingle allows you to deploy your own Android application to provide a seamless on-the-go mobile learning experience for your learners. Depending on your subscription plan, you may be eligible for either a common app or a fully branded app. ...How to Apply for an iOS Application?
Edmingle offers iOS application deployment to enable learners to access your academy via the Apple App Store. Depending on your plan, you may access either a common app or a custom-branded app. Eligibility Based on Plan Core & Prime Plans: Eligible ...How to Register & Enroll New Learners?
Enrolling new learning in your organization’s learning platform helps the educator manage adding new learners. This section makes enrolling learners in their courses easy and ensures they have access to everything they need. By using this section, ...How to Whitelabel Your LMS Domain?
Whitelisting your LMS domain is the very first step to take control of your Academy Setup and Branding. White-labelling your domain lets you use a custom website URL that reflects your brand, creating a seamless and professional experience for your ...